 Here we show you how to install WordPress manually. Whether it really makes more sense to install WordPress manually or by 1Click is open to question. Those who install WordPress manually know at least the interrelations between the files on the server and the integration with the webhoster.
Step 1: Order webhosting
First a website must be ordered and available. We show the differences in webhosting in a separate article (currently only in german).
|
Note: It can take up to 24 hours until a new website is available. It makes sense to book the webhosting package one day before the installation. |
Often webhosters show construction site pages to show that the page can be reached on the net. If “Web Page Not Found” or similar is displayed in the browser, you have to wait. An installation is only possible when the website is accessible.

Step 2: SSL Setup
An SSL certificate must be set up. WordPress works without an SSL Certificate, but it is becoming increasingly difficult to direct readers to a blog that is not secure.
If the web host does not offer a convenient solution, the certificate can also be set up manually. How this works is shown in a separate article (currently only in german). The article is about the SSL conversion of a WordPress blog, but at the beginning of the article we show how the certificate is created and uploaded.
Step 3: Create database
A MySQL database must have been created on the server. To do this you need to go to the administration area of the web host, which is called either KIS or Plesk or something similar. The path to the corresponding option looks like this or similar:
KIS Produktverwaltung > Webhosting > Konfigurieren > Skripte und Datenbanken > Datenbank verwalten > Datenbank anlegen
or in the case of webgo:
webgo Webspace-Admin > Datenbanken > MySQL-Datenbanken > MySQL-Datenbank anlegen
Depending on the web host, the database name and user can be freely chosen or it is predefined by the system. A password must then be assigned. A comment or a description of the database helps to improve the assignment.
Database name, user and password are required later for the WordPress configuration.
|
Attention: Only one database may be used per application. It would be theoretically possible to let two CMS systems access one database, but problems are pre-programmed and we strongly advise against it! |

Step 4: Download WordPress
It is possible to download WordPress directly as a German localization. Alternatively you can download the English version.
The German installation can be found at https://de.wordpress.org/download/, the English version at https://wordpress.org/download/. After the download the file must be unpacked into any directory.
Step 5: wp-config configuration
This step is optional. If you skip this step, you will automatically create and configure this file in a later step of the installation – namely after uploading the installation to your own server.
If you want to modify the file in advance, you have to rename the file wp-config-sample.php to wp-config.php and then edit it with a text editor.
|
Attention: It is very important to use a text editor and not a word processing program like Word or Pages. At the same time, neither a space may be inserted at the beginning nor at the end of the file. |
Basically, this file is well commented. It is best not to change the comments and only search for the strings that are necessary for the configuration. The texts to be changed by the user are highlighted in red in the example below. It becomes obvious that there is not much to change in the configuration file. Further down, I will go into the individual entries in more detail.
This is what the wp-config.php file looks like:
// ** MySQL-Einstellungen ** //
/** Diese Zugangsdaten bekommst du von deinem Webhoster. **/

/**
* Ersetze datenbankname_hier_einfuegen
* mit dem Namen der Datenbank, die du verwenden möchtest.
*/
define('DB_NAME', 'datenbankname_hier_einfuegen');

/**
* Ersetze benutzername_hier_einfuegen
* mit deinem MySQL-Datenbank-Benutzernamen.
*/
define('DB_USER', 'benutzername_hier_einfuegen');

/**
* Ersetze passwort_hier_einfuegen mit deinem MySQL-Passwort.
*/
define('DB_PASSWORD', 'passwort_hier_einfuegen');

/**
* Ersetze localhost mit der MySQL-Serveradresse.
*/
define('DB_HOST', 'localhost');

/**
* Der Datenbankzeichensatz, der beim Erstellen der
* Datenbanktabellen verwendet werden soll
*/
define('DB_CHARSET', 'utf8');

/**
* Der Collate-Type sollte nicht geändert werden.
*/
define('DB_COLLATE', '');

/**#@+
* Sicherheitsschlüssel
*
* Ändere jeden untenstehenden Platzhaltertext in eine beliebige,
* möglichst einmalig genutzte Zeichenkette.
* Auf der Seite {@link https://api.wordpress.org/secret-key/1.1/salt/ WordPress.org secret-key service}
* kannst du dir alle Schlüssel generieren lassen.
* Du kannst die Schlüssel jederzeit wieder ändern, alle angemeldeten
* Benutzer müssen sich danach erneut anmelden.
*
* @since 2.6.0
*/
define('AUTH_KEY', 'Füge hier deine Zeichenkette ein');
define('SECURE_AUTH_KEY', 'Füge hier deine Zeichenkette ein');
define('LOGGED_IN_KEY', 'Füge hier deine Zeichenkette ein');
define('NONCE_KEY', 'Füge hier deine Zeichenkette ein');
define('AUTH_SALT', 'Füge hier deine Zeichenkette ein');
define('SECURE_AUTH_SALT', 'Füge hier deine Zeichenkette ein');
define('LOGGED_IN_SALT', 'Füge hier deine Zeichenkette ein');
define('NONCE_SALT', 'Füge hier deine Zeichenkette ein');

/**#@-*/

/**
* WordPress Datenbanktabellen-Präfix
*
* Wenn du verschiedene Präfixe benutzt, kannst du innerhalb einer Datenbank
* verschiedene WordPress-Installationen betreiben.
* Bitte verwende nur Zahlen, Buchstaben und Unterstriche!
*/
$table_prefix = 'wp_';
define(‘DB_NAME’, ‘datenbankname_hier_einfuegen’);
define(‘DB_USER’, ‘benutzername_hier_einfuegen’);
define(‘DB_PASSWORD’, ‘passwort_hier_einfuegen’);
Here you enter the database name, user name and password as they were created in step 3. Please make sure that only the red text is changed (if you have a red weakness: the text between the punctuation mark as »’«).
$table_prefix = ‘wp_’;
It is recommended to change the prefix so that hackers and attackers cannot simply modify the WordPress configuration and take over the blog. It is important that no more than four or five characters are used and that the prefix ends with an underscore.
The keys can easily be generated at https://api.wordpress.org/secret-key/1.1/salt/ and copied into the file.
Step 6 files upload
Now all unzipped files are uploaded via ftp. If you know how to do this, you can go directly to step 7.
Also here are differences within the webhosters. Usually you first have to specify in the administration area of the webhoster which directory the URL should point to. It makes sense to place a blog in a separate subdirectory. If you only want to have one blog, you can simply choose the top directory.
This option can be found in a menu item called domain assignment or similar. In HostEurope’s KIS, for example, the path is:
KIS Produktverwaltung > Webhosting > Konfigurieren > Domains > Domainzuordnung
or in the case of webgo:
webgo Webspace-Admin > Paket-Verwaltung > Domainverwaltung
Subsequently, an ftp user must also be created in the administration area of the web host.
In HostEurope’s HIS you can get there by following:
KIS Produktverwaltung > Webhosting > Konfigurieren > Webspace & Nutzer > FTP-Zugänge
or in the case of webgo:
webgo Webspace-Admin > Zusatz FTP Benutzer
|
Note: The domain assignment changes may require 15 to 30 minutes to take effect. FTP users, on the other hand, are usually active immediately. |
When you create an FTP user, you specify which directory the user is allowed to access. It depends on the web host whether general access to all directories is possible or whether access can only be granted to individual directories.
In any case, the ftp user must have access to the directory to which the domain references.
If the domain is routed to the directory /www/blog, then the ftp user must also be activated for this directory.
The WordPress files can now be uploaded using an FTP program. FileZilla is a good program here, but of course any other program works as well. In this program a connection to the server has to be established.

The server used to set up the connection depends on the web host. Often the web hosters already specify the server when creating the ftp user.
At HostEurope the server is e.g. wp1234567.server-he.de, at wegbo s123.goserver.host. The respective numbers are to be replaced by the own package numbers. User name and password are the same, as just under ftp-User were created. You don’t have to specify a port, since both the FTP programs and the webhosters now use standard ports.
|
Important: The index.php file of the WordPress installation must be at the top level of the URL. |
Who has copied the WordPress installation into the standard directory of the webhoster must now delete the index.html. This is the “construction site page”, which is automatically created to show that a website is accessible.
Step 7 Finish installation
The installation of WordPress is completed by opening the URL in any browser. If everything has been done correctly, you go through a few installation steps and the blog is ready.
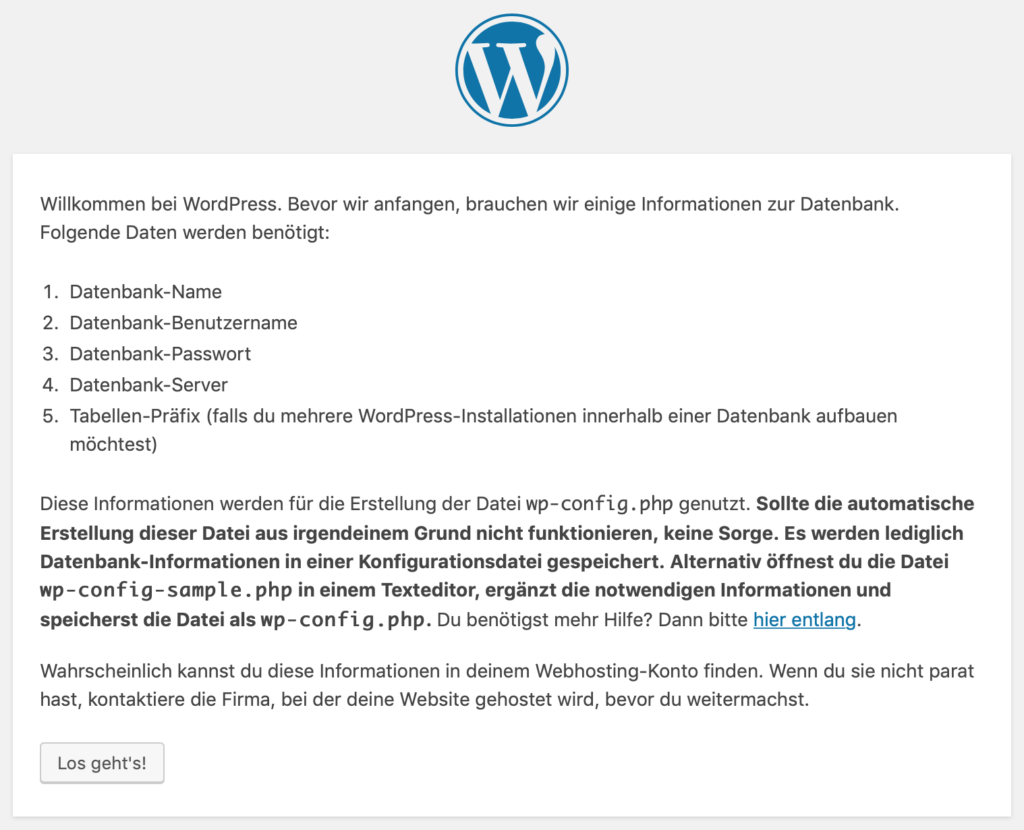
If you have not modified the wp-config.php file before, you will be asked for the database, the user and the password. In detail it looks like this:


Afterwards another window appears with the note that one can log in now.
Don’t forget to delete the index.html if it still exists in the directory. WordPress uses the file index.php.

Leave a Reply